Configure GCB for Service Mesh and HTTPS/2 Support with Metadata through GigaVUE-FM GUI
This section describes how to configure GCB through GigaVUE-FM GUI. Refer to the following section for details.
Launch GigaVUE-FM
The recent GigaVUE-FM image files can be downloaded from Gigamon Customer Portal. After fetching the image, upload and launch GigaVUE-FM on your OpenStack environment. For assistance, Contact Technical Support of Gigamon or refer to the GigaVUE Cloud Suite for OpenStack Guide for more information on V Series configuration on OpenStack environment.
Create Metadata Field Names
Create Monitoring Domain
To create a monitoring domain in GigaVUE-FM:
- In GigaVUE-FM, on the left navigation pane, select Inventory > VIRTUAL > KubernetesGCB > Monitoring Domain. The Monitoring Domain page appears.
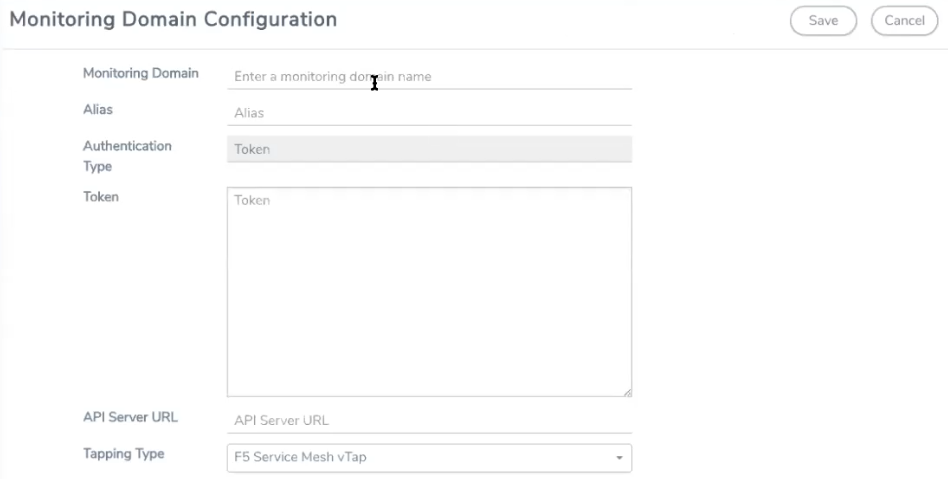
- In the Monitoring Domain page, click New. The Monitoring Domain Configuration wizard appears.

- Enter or select the required information as described in the following table,
Fields
Description
Monitoring Domain
Enter a name for the monitoring domain
Alias
Enter a name for the GCB connection
Authentication Type
Select Token as the authentication type
API Server URL
Enter the URL of the API server
Tapping Type
Select F5 Service Mesh vTap as the Tapping Type
- Click Save to create a monitoring domain.
Note: After creating a monitoring domain, you must add F5 field information through REST API. Refer to Configure GCB for Service Mesh and HTTPS/2 Support with Metadata through API.
Configure Traffic Policy
To create a Traffic Policy in GigaVUE-FM:
- From the GigaVUE-FM left navigation pane, select Traffic > VIRTUAL > Orchestrated Flows > KubernetesGCB. The Orchestrate page appears with the Traffic Policy tab.
- In the Traffic Policy tab, click Create. The Create Tunnels and Rules wizard appears.
- In the Tunnels tab, enter or select the required information as described in the following table:

Fields
Description
Tunnel Name
Enter a name for the Tunnel.
Remote IP Address
Enter an IP Address for the Tunnel.
Tunnel Type
Select L2GRE or VXLAN as the tunnel type.
Tunnel Key
Enter a value for the tunnel key.
Destination Port
If the tunnel type is VXLAN, enter the tunnel destination port number.
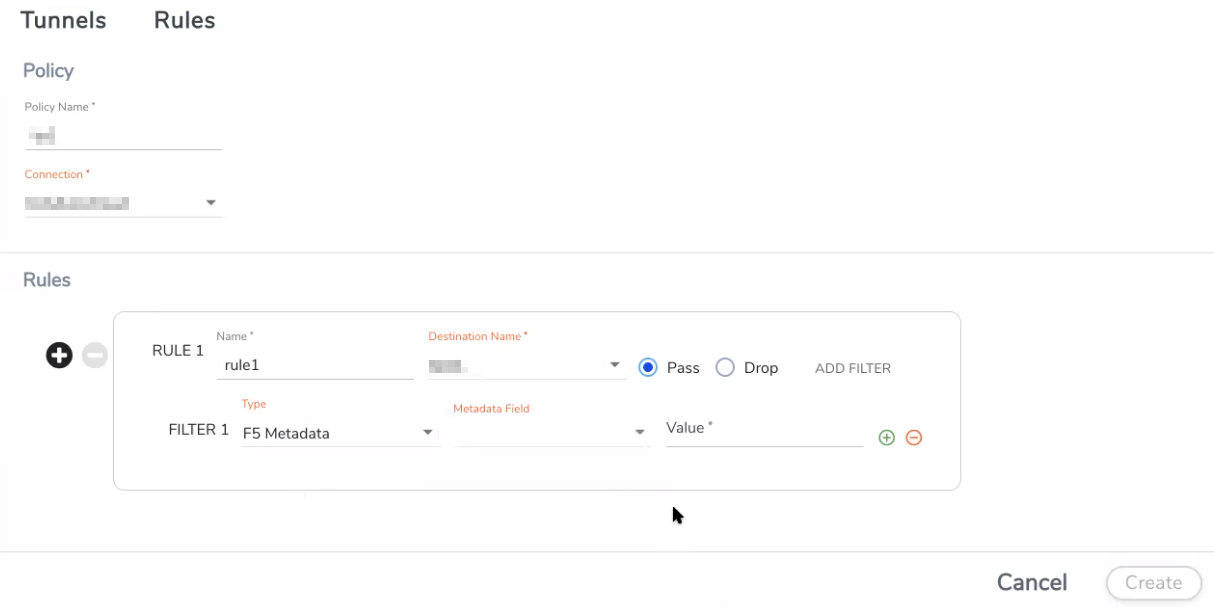
- Switch to Rules tab, and enter or select the required information as described in the following table:

Fields
Description
Policy
Policy Name
Enter a name for the policy.
Connection
Select a connection for the policy.
Rules
Name
Enter a name for the Rule.
Destination Name
Select a tunnel destination.
Pass/Drop
Select Pass to allow the packets or select Drop to block the packets based on the filters.
Click ADD FILTER to add filters for the rule.
Type
Select the type as F5 Metadata.
Metadata Field
Select a Metadata field name.
Filter value
Enter a value for the filter type.
- Click Create and this new Traffic Policy deploys itself in the GCB.
The Traffic Policy processes the Pcapper traffic and forwards the traffic to the tunnel destination IP address.


